All vehicles rely on a specific set of fluids to operate, and each system carries its own maintenance requirements. Luckily, most of these fluids are very easy to check and top off if needed. Let's go over the most commonly encountered types.
This is part 3 of our Road Trip Checklist series. Part 1 reviews tires and Part 2 details how to inspect the brakes and battery. Part 4 goes over lights and filters.
- Check oil
If your vehicle has an engine, it needs oil to stay lubricated. Most cars and trucks on the market feature a dipstick to check the oil level, and the following instructions will assume as much. Certain cars are not equipped with dipsticks and instead rely on an electronic sensor to measure the oil level. In this case, the owner's manual will outline the conditions that need to be met before the system delivers an accurate reading.
We recommend checking the oil before the vehicle has been driven, since hot oil carries burn risks if some accidentally gets flicked or dropped on bare skin. Make sure your vehicle is on level ground before pulling the dipstick. Any incline in any direction will cause the oil to move around in the sump, causing an inaccurate reading. Pull the dipstick out - you'll notice there's a minimum and maximum marking on the end of the dipstick to indicate how much oil is in the sump. Note the oil on the dipstick and wipe it off with a paper towel or rag, making sure you don't get any particles on the dipstick. If the color of the oil is extremely dark, you'll want to get the oil changed soon. Insert the dipstick back into its tube. Make sure it's pushed all the way down, then pull it back out to check a second time. If it's between the "minimum" and "maximum" markings, you don't need to do anything else.

If the oil level on the dipstick is below the "minimum" line, you run the risk of oil starvation and internal engine damage. It's easy enough to fix: find out what type of oil your engine needs and simply pour it into the engine through the designated filler. Make sure the cap stays clean after you unscrew it - dropping it on the ground can introduce contaminants into the engine oil. Pour slowly and take frequent measurements. In many vehicles, the amount of oil between the "minimum" and "maximum" markings on the dipstick is exactly one quart. Once the oil level stabilizes between the two markings, put the filler cap back on and make sure the dipstick is seated tightly.
If the oil on the dipstick is above the "maximum" line, the sump is overfilled. Contrary to popular opinion, an overfilled sump carries more real-world risk of engine damage than an underfilled one. When the oil level is higher than the specified maximum, the crankshaft will make contact with the oil in the sump. This has an effect comparable to beating eggs in a bowl - it creates froth in the oil. This is bad news: the air bubbles can get distributed throughout the engine and create "holes" in the lubrication. This results in direct metal-on-metal contact which eventually leads to premature wear and engine failure. Ironically, it's the same type of failure that can occur from having too little oil, only that it's more likely for this to occur during normal driving conditions.
Unfortunately, fixing an overfilled sump is not a simple process. The most hassle-free way is to have a professional mechanic drain the oil and fill the engine back up with the correct amount, but this requires towing the car to the shop. The DIY solution is to remove the excess oil yourself, but there are certain tools needed for this to be doable in your garage or driveway. You'll need a fluid extractor with enough reach to go all the way down the dipstick tube - we specifically recommend the Mityvac 7201 Evacuator Plus for this purpose. It's not an inexpensive tool by any means, but it's beyond reliable and can make future oil changes so much easier. A slightly less expensive option is the EWK 6.5-liter fluid extractor, but between the Mityvac's external pump and ability to reverse pressure direction (allowing the oil in the device to be dispensed by flipping a switch), it's worth spending the extra money for the Mityvac.
Using any suitable fluid extractor, insert the extraction tube all the way into the dipstick tube. Pump out at least a quart of oil before removing the tube, then replace the dipstick and check the oil level. As before, the ideal amount is anywhere between the "minimum" and "maximum" markings; feel free to adjust it to your preference. If you've extracted too much oil, add some back until the level falls between the two markings. If the dipstick is still coated in oil above the "maximum" line, you'll need to extract more oil before measuring again.
Note: If you own an electric car, you can skip this step. Electric motors are self-contained and require no external lubricants.
- Check coolant
Engine coolant is another vital fluid that your vehicle relies on. Coolant carries the heat away from the engine and allows the radiator to disperse it; without it, the engine would overheat after just a few minutes of driving. Fortunately, it's extremely easy to check the coolant level in many cars. Typically, you'll find a translucent tank with a colored liquid - usually red, pink, green, or blue. There's often an icon on the cap on that tank that shows water in a box; otherwise, it may simply say "coolant" on the cap. The tank itself normally has a "minimum" and "maximum" marking on the side. If the coolant level sits between the two, you can move on.
If the coolant level sits slightly above the "maximum" line, it won't cause any real harm to your vehicle. When the system heats up and causes the coolant to expand, any excess amount will simply evacuate itself through the overflow line and leak out onto the ground. The only real danger this poses is to animals; coolant has a sweet smell that will attract pets, and the chemicals used in coolant are extremely toxic (even in tiny amounts) to dogs and cats. If you'd rather be proactive and correct the level to mitigate any risks, all you need is a cheap turkey baster to remove the extra coolant from the tank. Just be sure to label this one to avoid mixing with food basters, since coolant is toxic to humans as well.

WARNING: NEVER attempt to gain access to the cooling system when the engine is hot! A hot (i.e. recently driven) cooling system carries both extreme temperatures and pressure, and opening the cap carries a very real possibility of rapid expansion of scalding fluid. In other words, boiling coolant and steam will explode outwards and will cause major burns almost instantly. When in doubt, let your vehicle cool for several hours - overnight, if timing allows.
If the coolant registers under the "minimum" line, top it up as needed. However, it's extremely important to find out what type of coolant your vehicle takes, as there are many different types available. Your owner's manual should have this information, and it may be written on the cap itself. Mixing two chemically incompatible coolants will cause the fluid to congeal and cause extensive damage to the cooling system. Never mix two coolants of different colors, even if the labels indicate compatibility otherwise. As well, some coolants come pre-mixed while others are pure concentrate. For the latter, you'll need to mix an even amount of coolant concentrate and distilled water (and ONLY distilled water, as the minerals in drinking water can contaminate the system and create chemical reactions) to create the required blend.
Though it's normal for the coolant level to fluctuate under regular driving, frequently needing the tank topped up is an indication that there's a leak somewhere in the system. If this is the case, consult a professional mechanic to have your vehicle diagnosed.
Optional: You can check the condition of the coolant in your car with an inexpensive coolant/antifreeze tester. This tester uses a float to measure the concentration of the coolant, and the clear case also makes it easy to inspect the coolant itself for any contaminants or rust.
- Check power steering fluid
Power steering comes standard in just about every single vehicle sold today, with a few notable exceptions. Though electronic power steering has become commonplace (see note below) in newer vehicles, many cars and trucks on the road today use hydraulic power steering systems. This one is easy to check - simply locate the power steering fluid reservoir and remove the cap. It should have either a steering wheel symbol or the words "power steering" on the cap itself, making it readily identifiable. In many vehicles, there is a small dipstick built into the underside of the cap. Verify that the fluid level is between the "minimum" and "maximum" lines on the dipstick and replace the cap. If it's low, top it up with the type of fluid specified by your vehicle's manufacturer. An overfilled reservoir won't create any major problems, but there's always the chance that the excess fluid will overflow out the system and make a mess. If you're concerned, you can use the same turkey baster that was used to extract the coolant to pull some power steering fluid out of the reservoir (make sure it's clean and dry to avoid fluid cross-contamination) to correct the level.
Note: Many newer vehicles are built with electronic power steering systems that have no user-serviceable parts. If you can't find a power steering fluid reservoir, you can skip this step entirely.
- Check brake fluid
Brake fluid is a critical safety component that often goes ignored, as it carries minimal maintenance requirements and will not exhibit any symptoms that point to failure. Over time, the fluid will lose effectiveness due to extreme temperature cycles and will absorb moisture that lowers its effective boiling point. The first sign of trouble is outright brake failure - not ideal, not to mention extremely dangerous. Being diligent with checking the brake fluid can go a long way towards minimizing this risk.
The brake fluid reservoir typically sits close to the base of the windshield, high above all of the other components in the engine compartment. In some cases, it may even be enclosed in a separate compartment with a cover to provide access. You won't need to open the reservoir cap to visually inspect the brake fluid. Check the fluid level and note the color of the fluid itself. Similar to the coolant tank, there should be a level indicator built into the side of the brake fluid reservoir. Color-wise, new brake fluid is typically appears pale yellow/amber and darkens as it ages. If the fluid appears low or dark (or both), you may need to service it soon.
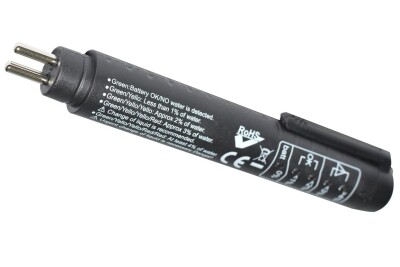
Optional: A brake fluid tester can quickly determine the condition of your vehicle's brake fluid by measuring the water/moisture content. Remove the reservoir cap and place it somewhere secure, ensuring that it is kept clean. Dip the tester probe into the top of the brake fluid and press the test button. The light-up indicators will illuminate according to the amount of moisture found in the fluid. If the tester indicates 3% or more moisture content, consult a professional mechanic for a brake fluid service.
Note: Brake fluid operates in a sealed system, meaning the fluid level remains fixed and will not fluctuate like coolant or engine oil. If the brake fluid level appears low in the reservoir, it's likely that the fluid has been distributed in the lines due to worn brake pads.
- Windshield Washer Fluid
Any road trip comes with its fair share of bugs and grime on the windshield. In order to maintain visibility, vehicles are equipped with windshield washer jets that can help remove dirt and dust. Locate the tank and pop the cap; if it looks low, add more. You can use plain water in a pinch, but dedicated windshield washer fluid is far more effective on the road.
Up next in Part 4: Lights, Filters, and final prep